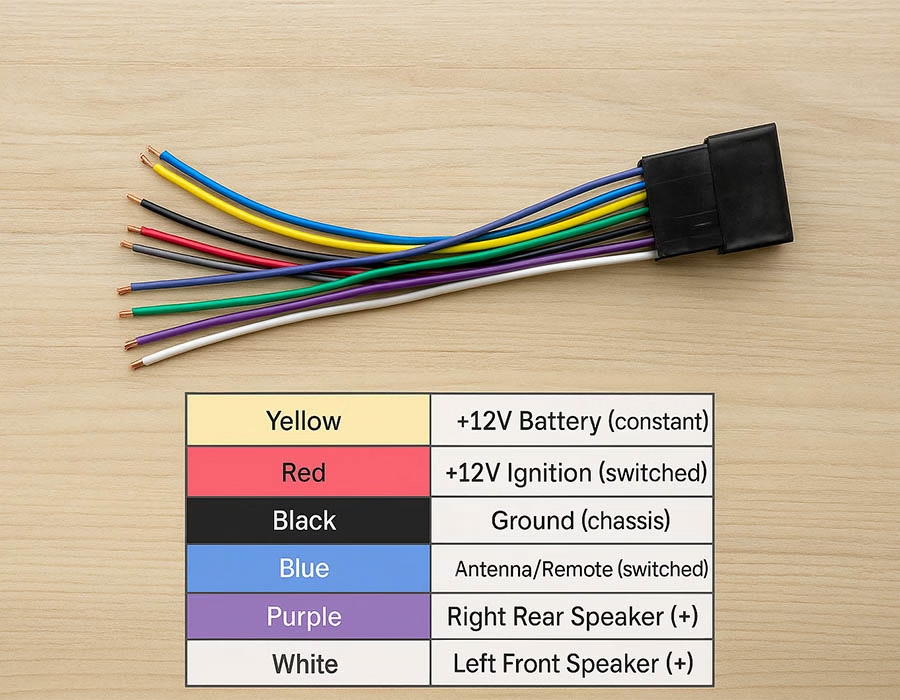
Upgrading or installing a new car stereo requires understanding wire color codes to avoid blowing fuses or short-circuiting. In modern audio installations, aftermarket harnesses adhere to a standard color scheme (as per EIA guidelines), allowing you to match like-for-like wires. Yellow is typically the +12V constant (battery) lead, Red is +12V switched (ignition/ACC), and Black is ground. These key colors should light up your head unit once connected.
Beyond power wires, you’ll have Blue/White for amp turn-on and Orange/White for dimmer/illumination, with speaker pairs in White, Gray, Green, and Purple (each with a matching black-striped negative). Understanding this color chart ensures your new stereo wiring diagram lines up correctly and avoids damage from miswiring.
💡 Looking for high-quality car stereo wiring harnesses?
Romtronic offers a wide range of custom wiring harnesses designed to make your car stereo installation seamless and efficient.
👉 Explore our custom car wire harness to find the perfect fit for your vehicle.
EIA aftermarket wiring color chart
For reference, here’s a standard EIA aftermarket wiring color chart (many stereo manufacturers follow these conventions). The table below shows typical wire colors and their functions:
| Wire Color | Function |
|---|---|
| Yellow | +12V Battery (constant) |
| Red | +12V Ignition (switched) |
| Black | Ground (chassis) |
| Blue | Antenna/Remote (switched +12V) |
| Blue/White | Amp Turn-On (+12V when head unit on) |
| Orange | Illumination (+12V to dash lights) |
| Orange/White | Dash Dimmer (variable 0–12V) |
| White | Left Front Speaker (+) |
| White/Black | Left Front Speaker (–) |
| Gray | Right Front Speaker (+) |
| Gray/Black | Right Front Speaker (–) |
| Green | Left Rear Speaker (+) |
| Green/Black | Left Rear Speaker (–) |
| Purple | Right Rear Speaker (+) |
| Purple/Black | Right Rear Speaker (–) |
Each stereo brand may label these slightly differently, but Yellow = constant power, Red = ACC, and Black = ground is a universal designation. Always refer to your specific head unit’s manual (even budget models, such as Temu, list these) and match by function, not just color. Many tutorial sites confirm these assignments (for example, QualityMobileVideo’s wiring guide clearly indicates that Yellow = constant 12V, Red = accessory 12V, and Black = chassis ground).
💡 Need assistance with your car audio wiring?
Romtronic specializes in custom car audio wiring solutions, offering tailored harnesses to meet your specific needs.
👉 Contact us today for expert advice and support.
Aftermarket Harness vs. Factory (OEM) Wiring
Aftermarket head units and harnesses adhere to the EIA standard mentioned above, whereas factory (OEM) systems typically employ different codes. For instance, a Ford or Toyota harness might use unique colors. That’s why experts stress constantly checking your car’s wiring diagram before cutting wires. Installers use vehicle-specific adapter harnesses or interfaces to avoid hacking the factory loom.
These adapters translate the OEM color scheme to the standard aftermarket colors, ensuring that things plug in. If you’re manually splicing, note that OEM wiring colors vary by make/model. For example, some Hondas use colors like solid blue for a power antenna or pink for speed-sense. When in doubt, use a multimeter or a factory wiring chart to verify each wire’s purpose. Never assume an OEM wire’s color means the same as an aftermarket chart.
Reading a Car Stereo Wiring Diagram
A wiring diagram (for your car or stereo) is like a map of these color codes. It shows the color and destination of each wire. On an aftermarket radio diagram, you’ll see the colors listed as above (often in small print or on a sticker). Factory diagrams use different labels; consult a service manual or an online resource for your specific model. Key tip: Use a multimeter to distinguish between constant and switched power. If colors don’t match, always disconnect the battery when testing.
When hooking up a stereo, match functions (12V+, ACC, ground, speakers) rather than exact hues. For example, a Yellow wire from the radio connects to the factory wire that supplies a constant 12V. Many how-to guides note, “match the functions of the aftermarket harness with the factory harness and solder or crimp securely.”
- Check the +12V power: The Yellow (battery) and Red (ignition) wires must connect to their respective constant or ACC feeds.
- Ground first: Connect the Black to a solid chassis ground. This ensures a reference point.
- Speakers: Pair speaker wires by color (the +/- pairs above). Verify left/right vs. front/rear by testing the stereo output if you see unmatched colors.
- Illumination/dimmer (Orange): Optional wires are only necessary if you want your dash lights to dim with your headlights. If not used, cap them off.
Always test connections before final assembly. Many professionals use quick-twist connectors or solder joints insulated with heat shrink for reliability.
Troubleshooting & Tips
- No Power or Stereo Dead? Check fuses and confirm that the Yellow wire has a constant 12V (with a test light or meter). If only Red had power, try swapping the Yellow and Red leads.
- One Speaker Out? Double-check speaker wire pairs. Each speaker set is a color pair (e.g., Gray/Gray-Black). A reversed +/- on a pair can phase-cancel sound.
- Illumination/Dimming Issues: If the dashboard lights don’t work, the Orange/White dimmer might be mismatched. This wire is often optional, but capping it off (insulating the loose end) fixes most issues.
- Can’t Find Wires? If the colors don’t match expectations, trace the wires with a meter or follow harness tap-offs. Many newer cars put stereo power on a separate “wake-up” signal.
For a smooth install, use a harness adapter whenever possible. This preserves factory connectors and color codes. Adapters, such as those from Metra or PAC, prevent guesswork. And remember: soldering connections and using shrink tubes are more secure than relying on loose wire nuts.
- Identify wires by both color and function before cutting.
- Always fuse your +12V lead properly (usually a 10A fuse for a head unit).
- Bullet Label any splices (use tape or cable tags) so future troubleshooting is easy.
- Consider a line-out converter if you’re retaining a factory amp – the color code chart for that will vary (often noted in the service documents).
Wiring Harness Connectors and Products
Quality connectors and harnesses make installation easier. For example, Romtronic manufactures a range of wire harness kits and adapters for both aftermarket and OEM systems. Our kits come with clear wire labels matching the functions above, so you instantly know which is speaker, power, etc. Using pre-made harnesses avoids cutting the car’s factory radio connector, preserving resale value and safety features.
Romtronic also offers bullet connectors, heat-shrink tubing for power, and speakers for neat splices. When purchasing a new head unit or aftermarket radio wiring harness, look for one specifically designed for your car’s model. Romtronic’s OEM/ODM expertise enables us to tailor harnesses to fit a wide range of vehicles, from Ford to Nissan, as well as classic GM radios.
Regardless of the head unit you install, safe wiring always beats shortcuts. Follow the color guides above, and consult a wiring diagram for your car or stereo if you are in doubt. With properly matched wires and high-quality connectors, your aftermarket stereo will deliver excellent sound without any issues.
At Romtronic, we use the same industry-standard color codes in our factory harnesses, ensuring compatibility with most car radios and vehicles. Whether it’s an aftermarket head unit or integrating a factory OEM system, our wiring solutions save installation time and avoid costly mistakes. Remember, a correct wiring diagram (and sometimes a Romtronic harness) is the first step to a flawless car stereo hookup.
.avif)
Sam Wu is the Marketing Manager at Romtronic, holding a degree in Mechatronics. With 12 years of experience in sales within the electronic wiring harness industry, he manages marketing efforts across Europe. An expert in cable assembly, wiring harnesses, and advanced connectivity solutions, Sam simplifies complex technologies, offering clear, actionable advice to help you confidently navigate your electrical projects.