


Modern vehicles need more juice than old wiring can safely handle. Upgrading the car wiring harness is a smart first step for any electrical overhaul. That ancient factory harness under your dash wasn’t designed for today’s high-amperage, LED, or audio systems. Replacing it may sound daunting, but it brings big rewards: a reliable, safer system that won’t leave you stranded with blown fuses or flaky grounds.
Why Upgrade and Plan Ahead
Adding gadgets (such as a big stereo, powerful lights, and heated seats) can overload an old electrical system. If you see flickering gauges, dim headlights at idle, or constantly blown fuses (as in our F-150 example), that’s a red flag. Before you start buying parts, make a wish list of everything you want to power. Count each device as a separate circuit, including horns, fuel pump, fans, sound amplifiers, and more.
Choosing a Wiring Harness
Street rods and project cars utilize three main harness styles: fuse-panel harnesses (wires already attached to a fuse block), load-end harnesses (wires from devices terminated at the fuse panel), and exact-fit OEM-style kits (which match the original factory routes). For restorations, an exact-fit or “factory fit” harness is ideal; for customs or swaps, a universal kit offers flexibility. Many aftermarket harnesses (e.g., American Autowire) are available in Classic Update kits for modified classics, Factory Fit kits for strict restorations, or Universal kits that can be adapted to any build.
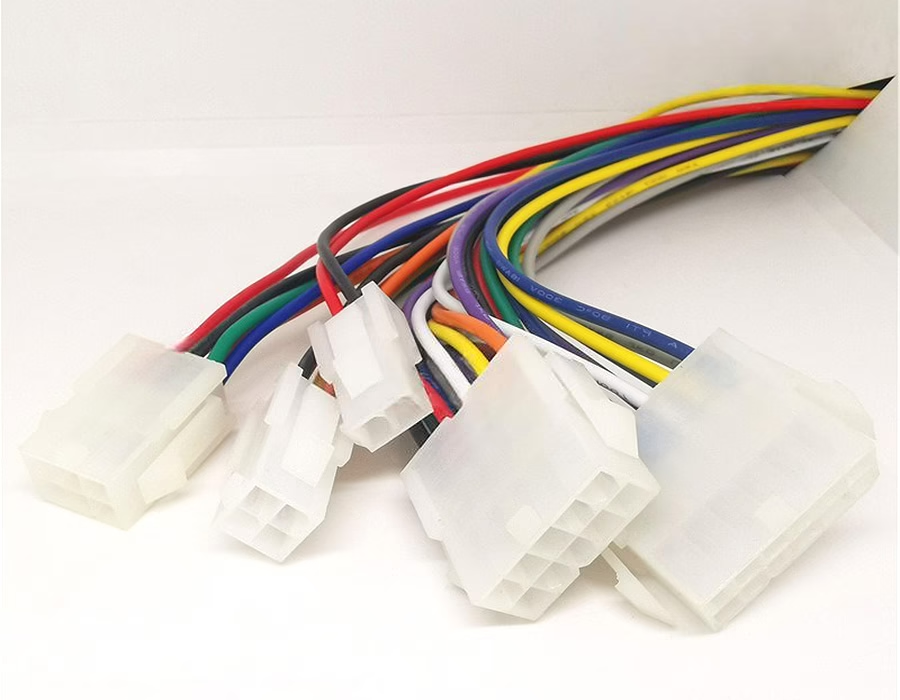
When you unbox a modern harness kit, it often arrives with wires pre-labeled and a fuse block ready to go. This modular design allows you to mount the fuse box wherever you want – under the dash, under a seat, or even in the trunk – and only use the circuits you need. For example, the photo above shows a harness where each wire is color-coded for its purpose. The big tip here: plan your fuse block location early. A new harness often allows you to relocate the fuse panel for a cleaner installation, unlike older systems that locked it behind the dash.
🔧 Looking for a wiring harness kit built for your specific ride?
Romtronic offers exact-fit and universal harnesses pre-labeled, with modular fuse panels — designed to make installation clean, safe, and hassle-free.
📩 Contact us now for a free fit-kit consultation & quote →
Installation Tips (Prepare and Install Carefully)
Upgrading wiring isn’t hard if you take it step by step. First, label and document everything before unplugging the old harness. Snap photos or mark each connector – this saves headaches later. Invest in high-quality tools, including a quality wire crimper, strippers, and terminals.
Lock the power off and begin swapping harness sections gradually. Keep track of unused circuits – remove any unneeded wires by de-pinning them and re-taping the bundle. This “right-sizing” will shrink the loom and reduce clutter. A neat harness is easier to work on later, so replace the old fabric tape with new harness tape or spiraled loom wherever possible.
Routing and Wire Protection
Once the harness is plugged in, tidy it up. Reroute harnesses through hidden channels or behind panels whenever possible. For instance, some builders hide front lighting wires between fender panels instead of over them. Keep wires off sharp edges and away from heat: use split loom or braided sleeves to wrap bundles. In high-heat areas (such as near exhaust headers), add thermal wire wrap.
Finally, double-check all ground connections. A surprising number of electrical gremlins come from poor grounds. Every ground strap must have bare metal contact – scrape off paint or rust. You can’t have “too many grounds”: ground the engine block, chassis, and body each directly to the negative battery terminal. Good practice is to add extra braided straps or aftermarket ground blocks to tie the engine, frame, and body together securely.
Battery and Alternator Upgrades
An upgraded harness often goes hand in hand with better battery/charging gear. If you relocate the battery (common in restorations), use a sealed AGM battery in a vented, secured box. AGM batteries avoid spills when inside the car. Always use thick, short battery cables from the battery to the engine and chassis, ensuring a matching gauge on both the positive and negative sides for symmetry.
Next, install a high-output alternator. Modern cars may draw 100-200+ amps with AC, fans, and sound. Experts recommend choosing an alternator ~20% larger than your total demand. Remember: alternators only hit peak output at higher RPM. At idle, you may get far less (a 140A unit might only give ~75A at 600 rpm). So oversized if you idle a lot.
Upgrading the alternator also means upsizing the charge wire. As a general rule, use at least 8 AWG cable for 85–125A alternators, 6 AWG for 125–150A, and 4 AWG for higher outputs. Going bigger than needed is safe; going smaller can cause your wires to short out.
⚡ Want an electrical system that keeps up with all your mods?
Romtronic can help you select or custom-build upgrade harnesses, batteries, and alternators that match your power needs — ensuring clean starts, strong lighting, and no blown fuses.
📞 Request your power upgrade plan & estimate today →
Fuse and Circuit Protection
Ensure you use the correct fuses: each fuse should match the amperage draw of its corresponding line. Avoid the old “use next size up” trick – an oversize fuse will not blow and could let wires overheat. Some builders upgrade the primary feeds to ANL or Maxi fuses for better safety. If your kit allows you to relocate the fuse panel to an accessible spot (such as the center console or under the seat), do so – it makes troubleshooting much easier later.
| Component | Upgrade Tip |
|---|---|
| Battery | Use a high-capacity, high-CCA battery (consider AGM if relocating inside). |
| Alternator | Replace with a high-output alternator (~20% more capacity than your total amp draw). Run thick charge cables (8AWG+). |
| Wiring Harness | Add extra ground straps from the engine, frame, and body to the battery. Sand paint off ground points for a clean connection. |
| Grounds | Install a new fuse block and use properly rated fuses for each load. |
| Fuses | Use high-quality wire tools, including crimpers, strippers, and heat-shrink tubing. Label harness connectors and follow instructions closely. |
| Tools | Use quality wire tools: crimpers, strippers, and heat-shrink. Label harness connectors and follow instructions closely. |
Frequently Asked Questions
A: Common signs are flickering lights, weak cranks, or fuses that blow when you add accessories. If you plan to add high-drain items (such as a big stereo, winch, or LED off-road lights), an upgrade is wise. Technicians note that older alternators “often don’t produce enough power to support the increasing electrical demand” of modern accessories.
A: Gauge depends on current. As a rule of thumb: 8 AWG for roughly 80–125 amps, 6 AWG up to ~150 amps, and 4 AWG or heavier for beyond that. Use very thick cables (like 1/0 AWG) for long runs or primary battery feeds. Always err on the side of being larger to minimize voltage drop.
A: The “Big 3” means upgrading the three main electrical connections: the alternator positive to battery positive, the battery negative to chassis/frame, and the engine block to chassis. In practice, this involves adding much thicker cables for those runs to reduce resistance and maintain a solid ground. Many problems go away once the Big 3 is done properly.
A: A lot of preparatory work (planning circuits, swapping the battery, installing the Big 3) you can do yourself with care. Complete harness swaps are a moderate DIY project if you’re handy with tools. The key is: read the instructions. Harness manufacturers stress that “installing a wiring harness isn’t difficult, but…read the instructions” for success. If you feel unsure at any step, a professional installer can ensure everything is safe and tested.
Each of these steps – careful planning, selecting the correct harness, and upgrading key components – provides a future-proof, robust electrical system. Take your time, double-check connections, and you’ll cruise worry-free with your new upgrades.
.avif)
Sam Wu is the Marketing Manager at Romtronic, holding a degree in Mechatronics. With 12 years of experience in sales within the electronic wiring harness industry, he manages marketing efforts across Europe. An expert in cable assembly, wiring harnesses, and advanced connectivity solutions, Sam simplifies complex technologies, offering clear, actionable advice to help you confidently navigate your electrical projects.

